MNIST Digit Classifier on the Web
A simple web service for MNIST digit classifier
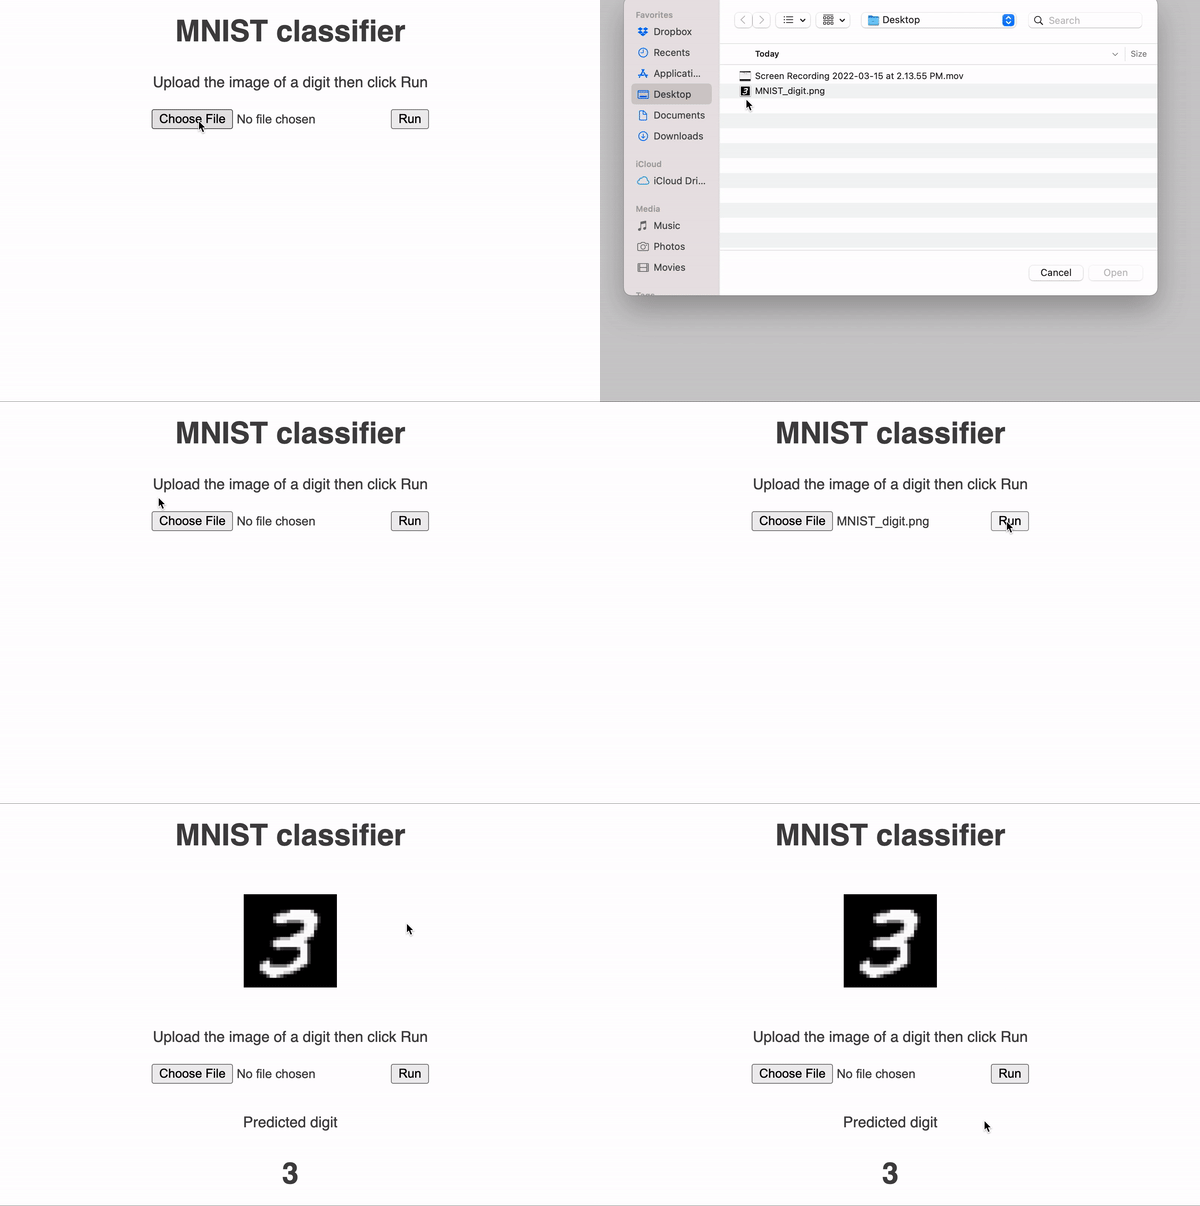
Here is what the final result looks like

Overview

There are three components of the system:
- Model checkpoint: the neural network’s weights uploaded to Google Cloud Storage. The weights will be downloaded and loaded into the model.
- Serverless HTTP endpont: functions on Google Cloud Functions that (a) receive input features sent from the web interface (b) make prediction, and (c) return the prediction to the web app.
- Webserver: a webpage to handle user input (an image) and display prediction result. In this guide, a simple Flask webserver is used for local development. Deployment to a web hosting service will be covered in a future guide.
This guide is largely based on the iris classification model article.
MNIST classification model
The convolutional neural network (CNN) and training code on MNIST can be found from this Pytorch example. The trained model’s weights can be downloaded from here.
Upload model checkpoint to a Google Cloud Storage bucket
- Create a Google Cloud Project (GCP). Note that the project’s name, e.g.
digit-guesser, will be used in later steps. -
Create a Google Cloud Storage bucket. Note that the “Public access status” can be set to “Not public”. The bucket’s name, e.g.
digit-guesser-model, will also be used in later steps. - Upload the model, e.g.
mnist_cnn.pt, to the created bucket.
Create a HTTP endpoint with Google Cloud Function

- Search for “function” in the search bar at the top of GCP
- Create a new function with “Allow unauthenticated invocations” checked and “512MB memory allocated” (so as to fit the model).
- Set the Runtime to
Python 3.8 -
Add
requirements.txtfor the packages needed:google-resumable-media==0.6.0 google-cloud-storage==1.30.0 google-cloud-bigquery==1.26.1 numpy torch torchvision - Add
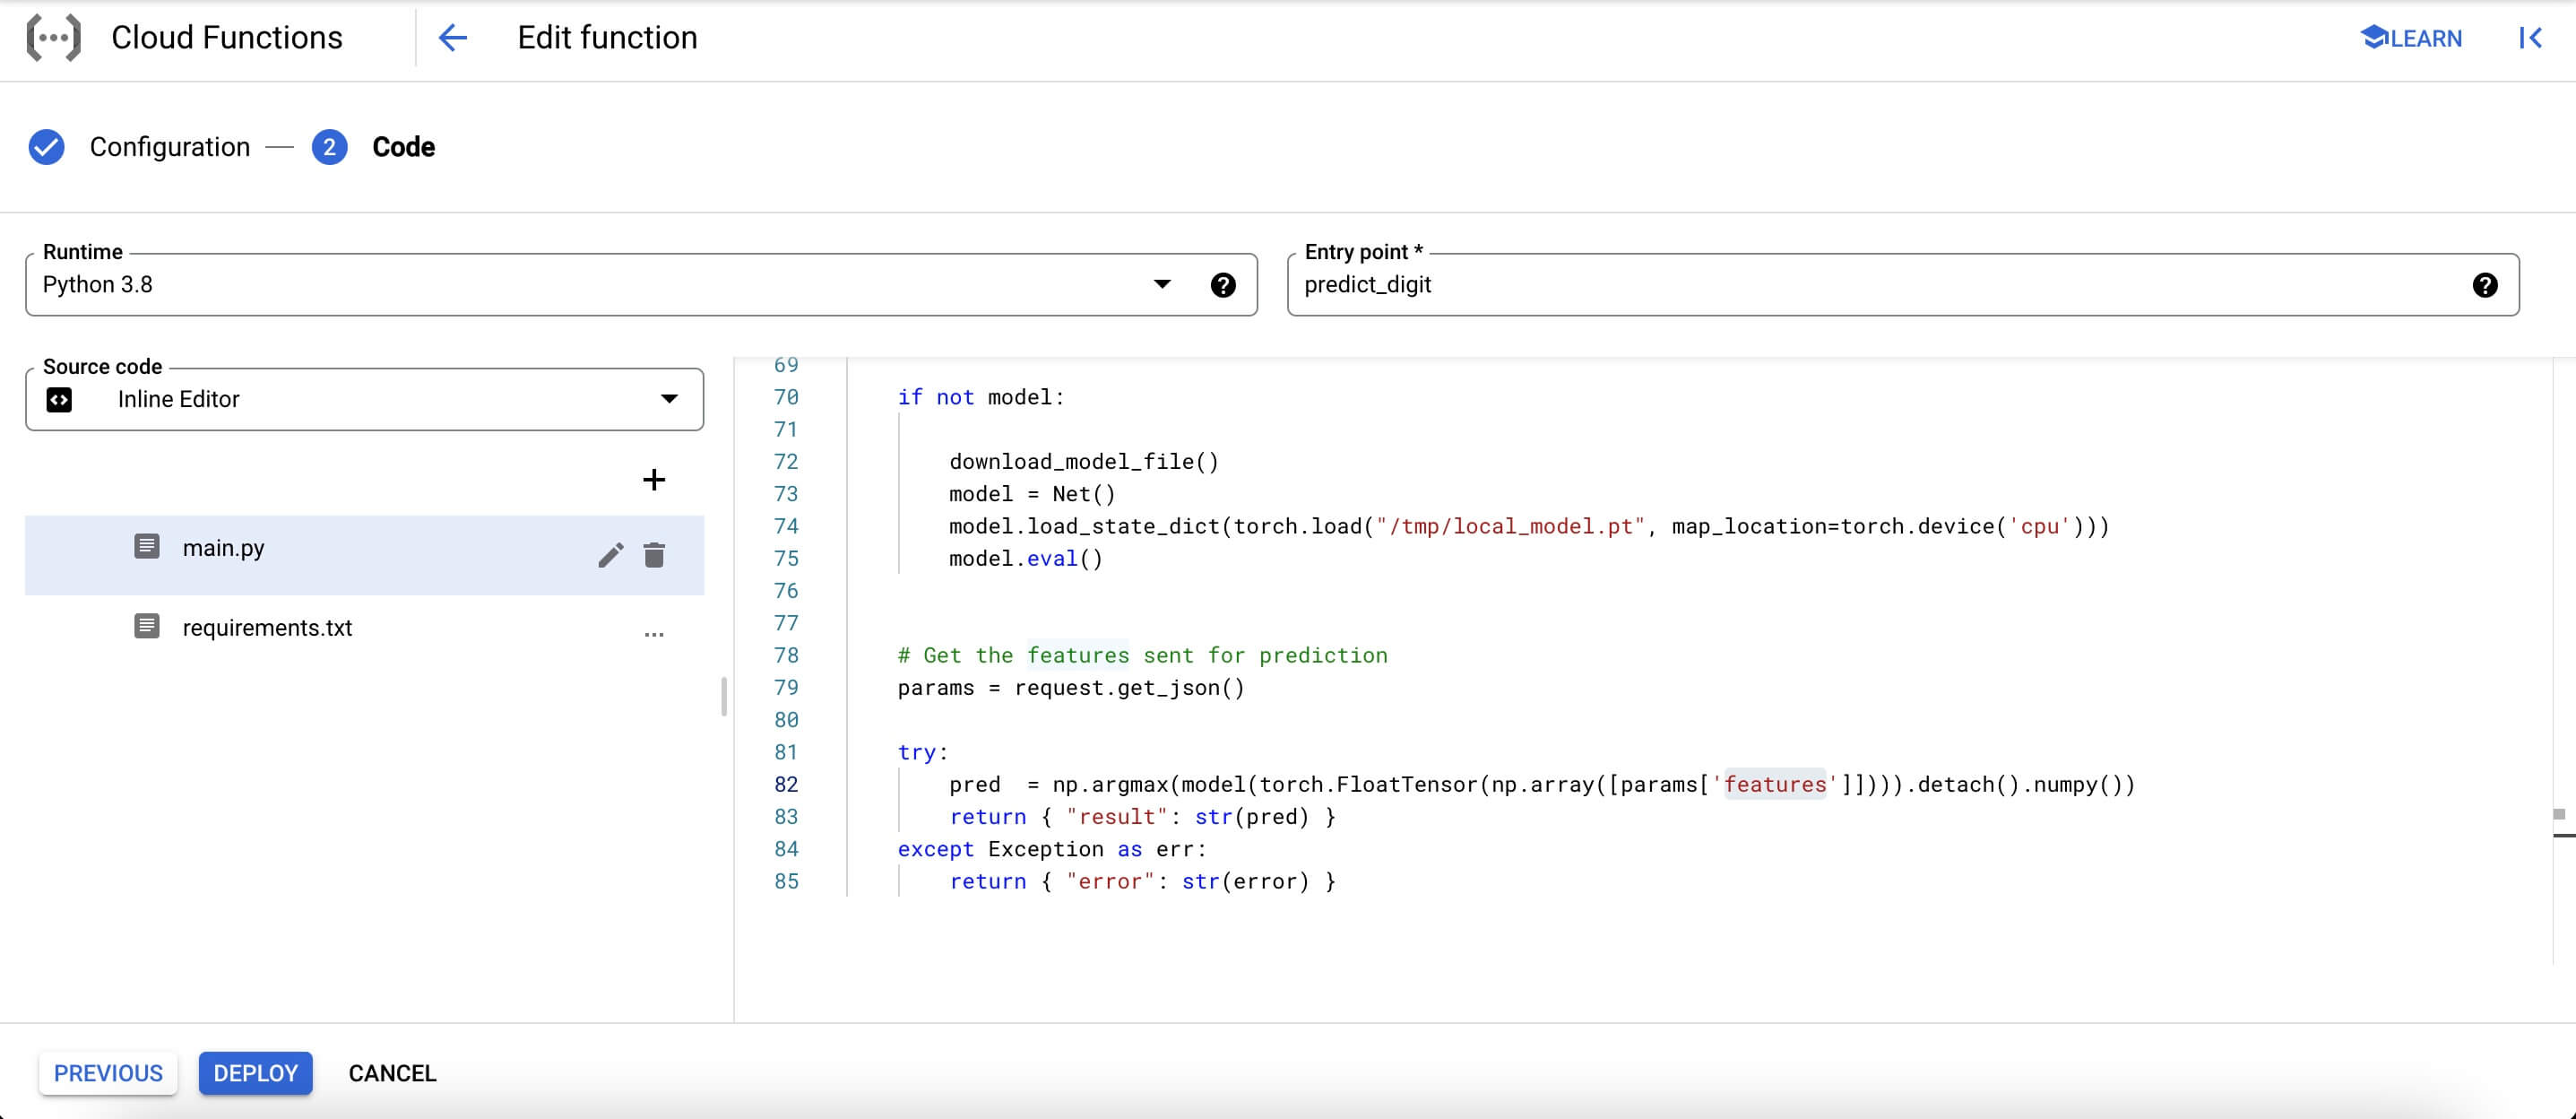
main.pythat contains the actual Python function for runnning prediction and returing the result:
1
2
3
4
5
6
7
8
9
10
11
12
13
14
15
16
17
18
19
20
21
22
23
24
25
26
27
28
29
30
31
32
33
34
35
36
37
38
39
40
41
42
43
44
45
46
47
48
49
50
51
52
53
54
55
56
57
58
59
60
61
62
63
64
65
66
67
68
69
70
71
72
73
74
75
76
77
78
79
80
81
82
83
84
85
import numpy as np
import json
import os
import torch
import torch.nn as nn
import torch.nn.functional as F
from google.cloud import storage

class Net(nn.Module):
    def __init__(self):
        super(Net, self).__init__()
        self.conv1 = nn.Conv2d(1, 32, 3, 1)
        self.conv2 = nn.Conv2d(32, 64, 3, 1)
        self.dropout1 = nn.Dropout(0.25)
        self.dropout2 = nn.Dropout(0.5)
        self.fc1 = nn.Linear(9216, 128)
        self.fc2 = nn.Linear(128, 10)

    def forward(self, x):
        x = self.conv1(x)
        x = F.relu(x)
        x = self.conv2(x)
        x = F.relu(x)
        x = F.max_pool2d(x, 2)
        x = self.dropout1(x)
        x = torch.flatten(x, 1)
        x = self.fc1(x)
        x = F.relu(x)
        x = self.dropout2(x)
        x = self.fc2(x)
        output = F.log_softmax(x, dim=1)
        return output

## Global model variable
model = None


# Download model file from cloud storage bucket
def download_model_file():

    from google.cloud import storage

    # Model Bucket details
    BUCKET_NAME        = "digit-guesser-model"
    PROJECT_ID         = "digit-guesser"
    GCS_MODEL_FILE     = "mnist_cnn.pt"

    # Initialise a client
    client   = storage.Client(PROJECT_ID)

    # Create a bucket object for our bucket
    bucket   = client.get_bucket(BUCKET_NAME)

    # Create a blob object from the filepath
    blob     = bucket.blob(GCS_MODEL_FILE)

    folder = '/tmp/'
    if not os.path.exists(folder):
      os.makedirs(folder)
    # Download the file to a destination
    blob.download_to_filename(folder + "local_model.pt")


# Main entry point for the cloud function
def predict_digit(request):

    # Use the global model variable
    global model

    if not model:

        download_model_file()
        model = Net()
        model.load_state_dict(torch.load("/tmp/local_model.pt", map_location=torch.device('cpu')))
        model.eval()


    # Get the features sent for prediction
    params = request.get_json()

    try:
        pred  = np.argmax(model(torch.FloatTensor(np.array([params['features']]))).detach().numpy())
        return { "result": str(pred) }
    except Exception as err:
        return { "error": str(error) }
- Make sure to change
BUCKET_NAME,PROJECT_ID, andGCS_MODEL_FILE(lines 44-47) have been set up in the previous sections. download_model_filefunction downloads the checkpoint saved in Google Cloud Storage to a directorytmpvisible locally to Google Cloud Function.predict_digitis the main action of the code and must match the entry point (set in the input textbox next to the Runtime dropdown). Basically, this function performs the following step:- Line 68-76: if the function is offline and the model is not yet initialized and cached in memory, download the model checkpoint via
download_model_fileand load the parameters’ weights intomodel - Line 79-85: looks for a field
featuresin the payload sent by the HTTP request, this is used as input for the model.
- Line 68-76: if the function is offline and the model is not yet initialized and cached in memory, download the model checkpoint via
- After deployment, the HTTP endpoint can be found in the
Triggertab. This URL will be used by the web app.
Test the function
After deploying the function, select the Testing tab and paste in the following:
{"features": [[[-0.4242, -0.4242, -0.4242, -0.4242, -0.4242, -0.4242, -0.4242,
          -0.4242, -0.4242, -0.4242, -0.4242, -0.4242, -0.4242, -0.4242,
          -0.4242, -0.4242, -0.4242, -0.4242, -0.4242, -0.4242, -0.4242,
          -0.4242, -0.4242, -0.4242, -0.4242, -0.4242, -0.4242, -0.4242],
         [-0.4242, -0.4242, -0.4242, -0.4242, -0.4242, -0.4242, -0.4242,
          -0.4242, -0.4242, -0.4242, -0.4242, -0.4242, -0.4242, -0.4242,
          -0.4242, -0.4242, -0.4242, -0.4242, -0.4242, -0.4242, -0.4242,
          -0.4242, -0.4242, -0.4242, -0.4242, -0.4242, -0.4242, -0.4242],
         [-0.4242, -0.4242, -0.4242, -0.4242, -0.4242, -0.4242, -0.4242,
          -0.4242, -0.4242, -0.4242, -0.4242, -0.4242, -0.4242, -0.4242,
          -0.4242, -0.4242, -0.4242, -0.4242, -0.4242, -0.4242, -0.4242,
          -0.4242, -0.4242, -0.4242, -0.4242, -0.4242, -0.4242, -0.4242],
         [-0.4242, -0.4242, -0.4242, -0.4242, -0.4242, -0.4242, -0.4242,
          -0.4242, -0.4242, -0.4242, -0.4242, -0.4242, -0.4242, -0.4242,
          -0.4242, -0.4242, -0.4242, -0.4242, -0.4242, -0.4242, -0.4242,
          -0.4242, -0.4242, -0.4242, -0.4242, -0.4242, -0.4242, -0.4242],
         [-0.4242, -0.4242, -0.4242, -0.4242, -0.4242, -0.4242, -0.4242,
          -0.4242, -0.4242, -0.4242, -0.4242, -0.4242, -0.4242, -0.4242,
          -0.4242, -0.4242,  1.7141,  2.8215,  1.0650, -0.3351, -0.4242,
          -0.4242, -0.4242, -0.4242, -0.4242, -0.4242, -0.4242, -0.4242],
         [-0.4242, -0.4242, -0.4242, -0.4242, -0.4242, -0.4242, -0.4242,
          -0.4242, -0.4242, -0.4242, -0.4242, -0.4242, -0.4242, -0.4242,
          -0.4242, -0.4242,  1.0141,  2.7960,  2.7960,  0.6959, -0.4242,
          -0.4242, -0.4242, -0.4242, -0.4242, -0.4242, -0.4242, -0.4242],
         [-0.4242, -0.4242, -0.4242, -0.4242, -0.4242, -0.4242, -0.4242,
          -0.4242, -0.4242, -0.4242, -0.4242, -0.4242, -0.4242, -0.4242,
          -0.4242, -0.4242,  1.3196,  2.7960,  2.7960,  0.6959, -0.4242,
          -0.4242, -0.4242, -0.4242, -0.4242, -0.4242, -0.4242, -0.4242],
         [-0.4242, -0.4242, -0.4242, -0.4242, -0.4242, -0.4242, -0.4242,
          -0.4242, -0.4242, -0.4242, -0.4242, -0.4242, -0.4242, -0.4242,
          -0.4242,  0.3395,  2.5924,  2.7960,  2.7960,  0.6959, -0.4242,
          -0.4242, -0.4242, -0.4242, -0.4242, -0.4242, -0.4242, -0.4242],
         [-0.4242, -0.4242, -0.4242, -0.4242, -0.4242, -0.4242, -0.4242,
          -0.4242, -0.4242, -0.4242, -0.4242, -0.4242, -0.4242, -0.4242,
          -0.0678,  2.4651,  2.7960,  2.7960,  2.1342,  0.3140, -0.4242,
          -0.4242, -0.4242, -0.4242, -0.4242, -0.4242, -0.4242, -0.4242],
         [-0.4242, -0.4242, -0.4242, -0.4242, -0.4242, -0.4242, -0.4242,
          -0.4242, -0.4242, -0.4242, -0.4242, -0.4242, -0.4242, -0.4242,
           0.5686,  2.7960,  2.7960,  2.7960,  1.6123, -0.4242, -0.4242,
          -0.4242, -0.4242, -0.4242, -0.4242, -0.4242, -0.4242, -0.4242],
         [-0.4242, -0.4242, -0.4242, -0.4242, -0.4242, -0.4242, -0.4242,
          -0.4242, -0.4242, -0.4242, -0.4242, -0.4242, -0.4242, -0.3988,
           2.0196,  2.7960,  2.7960,  2.6560, -0.3606, -0.4242, -0.4242,
          -0.4242, -0.4242, -0.4242, -0.4242, -0.4242, -0.4242, -0.4242],
         [-0.4242, -0.4242, -0.4242, -0.4242, -0.4242, -0.4242, -0.4242,
          -0.4242, -0.4242, -0.4242, -0.4242, -0.4242, -0.4242,  0.4795,
           2.7960,  2.7960,  2.7960,  1.8032, -0.4242, -0.4242, -0.4242,
          -0.4242, -0.4242, -0.4242, -0.4242, -0.4242, -0.4242, -0.4242],
         [-0.4242, -0.4242, -0.4242, -0.4242, -0.4242, -0.4242, -0.4242,
          -0.4242, -0.4242, -0.4242, -0.4242, -0.4242,  0.8741,  2.4396,
           2.7960,  2.7960,  2.5669,  0.1867, -0.4242, -0.4242, -0.4242,
          -0.4242, -0.4242, -0.4242, -0.4242, -0.4242, -0.4242, -0.4242],
         [-0.4242, -0.4242, -0.4242, -0.4242, -0.4242, -0.4242, -0.4242,
          -0.4242, -0.4242, -0.4242, -0.4242, -0.3478,  1.8923,  2.7960,
           2.7960,  2.5160,  0.9632, -0.4242, -0.4242, -0.4242, -0.4242,
          -0.4242, -0.4242, -0.4242, -0.4242, -0.4242, -0.4242, -0.4242],
         [-0.4242, -0.4242, -0.4242, -0.4242, -0.4242, -0.4242, -0.4242,
          -0.4242, -0.4242, -0.4242, -0.4242,  0.5940,  2.7960,  2.7960,
           2.7960,  0.8995, -0.4242, -0.4242, -0.4242, -0.4242, -0.4242,
          -0.4242, -0.4242, -0.4242, -0.4242, -0.4242, -0.4242, -0.4242],
         [-0.4242, -0.4242, -0.4242, -0.4242, -0.4242, -0.4242, -0.4242,
          -0.4242, -0.4242, -0.4242, -0.4242,  0.4540,  2.7960,  2.7960,
           2.7960,  0.3395, -0.4242, -0.4242, -0.4242, -0.4242, -0.4242,
          -0.4242, -0.4242, -0.4242, -0.4242, -0.4242, -0.4242, -0.4242],
         [-0.4242, -0.4242, -0.4242, -0.4242, -0.4242, -0.4242, -0.4242,
          -0.4242, -0.4242, -0.4242, -0.3478,  2.6687,  2.7960,  2.7960,
           2.7960,  0.0976, -0.4242, -0.4242, -0.4242, -0.4242, -0.4242,
          -0.4242, -0.4242, -0.4242, -0.4242, -0.4242, -0.4242, -0.4242],
         [-0.4242, -0.4242, -0.4242, -0.4242, -0.4242, -0.4242, -0.4242,
          -0.4242, -0.4242, -0.3606,  1.9051,  2.7960,  2.7960,  2.7706,
           1.0395, -0.4115, -0.4242, -0.4242, -0.4242, -0.4242, -0.4242,
          -0.4242, -0.4242, -0.4242, -0.4242, -0.4242, -0.4242, -0.4242],
         [-0.4242, -0.4242, -0.4242, -0.4242, -0.4242, -0.4242, -0.4242,
          -0.4242, -0.4242,  0.9377,  2.7960,  2.7960,  2.7960,  2.0451,
          -0.4242, -0.4242, -0.4242, -0.4242, -0.4242, -0.4242, -0.4242,
          -0.4242, -0.4242, -0.4242, -0.4242, -0.4242, -0.4242, -0.4242],
         [-0.4242, -0.4242, -0.4242, -0.4242, -0.4242, -0.4242, -0.4242,
          -0.4242,  0.1104,  2.0832,  2.7960,  2.7960,  2.5542,  0.6195,
          -0.4242, -0.4242, -0.4242, -0.4242, -0.4242, -0.4242, -0.4242,
          -0.4242, -0.4242, -0.4242, -0.4242, -0.4242, -0.4242, -0.4242],
         [-0.4242, -0.4242, -0.4242, -0.4242, -0.4242, -0.4242, -0.4242,
          -0.4242, -0.4242,  2.4396,  2.7960,  2.7960,  2.4142, -0.1569,
          -0.4242, -0.4242, -0.4242, -0.4242, -0.4242, -0.4242, -0.4242,
          -0.4242, -0.4242, -0.4242, -0.4242, -0.4242, -0.4242, -0.4242],
         [-0.4242, -0.4242, -0.4242, -0.4242, -0.4242, -0.4242, -0.4242,
          -0.4242, -0.4242,  2.4396,  2.7960,  2.7960,  1.0904, -0.4242,
          -0.4242, -0.4242, -0.4242, -0.4242, -0.4242, -0.4242, -0.4242,
          -0.4242, -0.4242, -0.4242, -0.4242, -0.4242, -0.4242, -0.4242],
         [-0.4242, -0.4242, -0.4242, -0.4242, -0.4242, -0.4242, -0.4242,
          -0.4242, -0.4242,  1.1414,  2.7960,  2.6815,  0.3013, -0.4242,
          -0.4242, -0.4242, -0.4242, -0.4242, -0.4242, -0.4242, -0.4242,
          -0.4242, -0.4242, -0.4242, -0.4242, -0.4242, -0.4242, -0.4242],
         [-0.4242, -0.4242, -0.4242, -0.4242, -0.4242, -0.4242, -0.4242,
          -0.4242, -0.4242,  2.3378,  2.0578,  0.4413, -0.4242, -0.4242,
          -0.4242, -0.4242, -0.4242, -0.4242, -0.4242, -0.4242, -0.4242,
          -0.4242, -0.4242, -0.4242, -0.4242, -0.4242, -0.4242, -0.4242],
         [-0.4242, -0.4242, -0.4242, -0.4242, -0.4242, -0.4242, -0.4242,
          -0.4242, -0.4242, -0.4242, -0.4242, -0.4242, -0.4242, -0.4242,
          -0.4242, -0.4242, -0.4242, -0.4242, -0.4242, -0.4242, -0.4242,
          -0.4242, -0.4242, -0.4242, -0.4242, -0.4242, -0.4242, -0.4242],
         [-0.4242, -0.4242, -0.4242, -0.4242, -0.4242, -0.4242, -0.4242,
          -0.4242, -0.4242, -0.4242, -0.4242, -0.4242, -0.4242, -0.4242,
          -0.4242, -0.4242, -0.4242, -0.4242, -0.4242, -0.4242, -0.4242,
          -0.4242, -0.4242, -0.4242, -0.4242, -0.4242, -0.4242, -0.4242],
         [-0.4242, -0.4242, -0.4242, -0.4242, -0.4242, -0.4242, -0.4242,
          -0.4242, -0.4242, -0.4242, -0.4242, -0.4242, -0.4242, -0.4242,
          -0.4242, -0.4242, -0.4242, -0.4242, -0.4242, -0.4242, -0.4242,
          -0.4242, -0.4242, -0.4242, -0.4242, -0.4242, -0.4242, -0.4242],
         [-0.4242, -0.4242, -0.4242, -0.4242, -0.4242, -0.4242, -0.4242,
          -0.4242, -0.4242, -0.4242, -0.4242, -0.4242, -0.4242, -0.4242,
          -0.4242, -0.4242, -0.4242, -0.4242, -0.4242, -0.4242, -0.4242,
          -0.4242, -0.4242, -0.4242, -0.4242, -0.4242, -0.4242, -0.4242]]]}
The JSON above has the same format as the the payload sent by the web app to the Cloud Function HTTP endpoint. The value in features is a 1xx28x28 numpy array (converted to a nested list) of the greyscale values for an image of digit 1 after normalizing by the MNIST training sample’s pixel-wise mean and standard deviation (line 114 here). The function should return {"result":"1"} as seen in the screenshot below.

Flask Web App
The example web app can be downloaded from https://github.com/ngohgia/mnist-webpage. The Flask web app preprocesses an input image submitted by the user and send the normalized numpy array of the image as a JSON via POST to the Google Cloud Function.
Here is a sample image for testing, the web app should return a prediction of the digit 3.

What’s next
The web app in this guide is very simple and meant for experimenting in local environment. There are other features that should be added for deployment to production, such as handling concurrent requests, having a database to save previous results etc. Another guide will cover such aspects. Stay tuned! :)